Friday, August 2, 2019

Just having fun mini album

I had so much fun creating this mini album for my daughter, Anneke, although it was a challenge to find all the photos.

Anneke and her bestie did a friendship photoshoot at the end of 2018, just before her bestie left for university.  They are now separated by 1200km.

Here are a few close-up photos of the album:


Paper used is from the Penelope Dee Utopia Collection.

Thanks for popping by!
Happy Scrapping
Carol

Tuesday, June 25, 2019

You make me smile


Another free page layout for you to complete:
REQUIREMENTS:
Penelope Dee Paper BE YOU Collection: 1x Be Amazing; 1x Be Bold; 1x Be Brace; 1x Be Happy; 1x Be Original
Celebr8 Chipboard MB2504
1x Coffee Cardstock


Instructions:
Step 1
Join PD 2150 and PD2151
 Step 2
Cut 15cm x 30.5cm pink and adhere flush on left side of the middle line.
Step 3
Cut 15 hexagons and border strip "You were born an original" for decorating.
Step 4
Cut 24cm x 24cm and adhere on right side of pink.
Cut 8cm x 24cm and adhere on left side of pink.
Make a tag 12cm x 7cm from white.
Keep border strip for decorating.
Step 5
Use a hexagon stencil with nuvo mousse and stencil on corners to soften edges.
Step 6
Using dark brown cardstock  mat and adhere photos as in picture.
2x 13cm x 14cm portrait and 3x 7cm x 14cm Portrait.
Make a tag 7cm x 12cm.
Step 7
Fussy cut quotes and lace for decorating.
Step 8
Color your chipboard title with  all-purpose inks.
Adhere Chipboard title on left of layout. 
Embellish with extra chipboard elements, hexagons, quotes, sequins and beads.
 
Happy Scrapping!
Carol

Monday, May 27, 2019

Daddy's Little Helper


I created this layout of my son, Devon for our local scrapbooking magazine Scrap Affairs.  

Here are the instructions to complete the layout:

REQUIREMENTS:

Celebr8 Working Man Paper Pack + Celebr8 Chipboard MB2504 + Embellishment Pack Working Man
Design Worx Chipboard Title - Daddy's Little Helper
1x Carrot Cardstock

Step 1

Cut C8 PP3604 21cm x 30.5cm
Flip this piece over and join the two pieces to make a full sheet of paper.

 Now join this new piece of paper to the 2nd sheet of C8 PP360

Step 2
Cut 9cm x 30.5cm blue and adhere 2.5cm from left edge.
Cut border strip(measuring tape)  from PP3601 and adhere to right edge of blue strip.
Cut 15cm x 10cm photo mat from blue.
  
Step 3
Cut chevron strip and adhere to bottom of layout as on picture.
Fussy cut machine corner on left of page.
Fussy cut gears for decorating.

Step 4
Using Celebr8 Matrix Mask and Nuvo Mousse stencil as in picture.

Step 5
Cut out remember quote.
Cut out tag - DATE: WHERE:
Cut out words to use for decorating.

Step 6
Adhere border strip to top left edge.
Fussy cut 2x medium grey frames.
Fussy cut 1x large grey frame.  Cut this frame up and make a medium frame.
Adhere these 3 frames on to the blue strip on left of page. Decorate middle frame with remember quote.

Step 7
Fussy cut top left corner.

 Step 8
Cut 2x photo mats 10cm x 15cm.

Step 9
Using carrot cardstock  mat and adhere photos as in picture.
3x 5.5cm x 7.5cm portrait - adhere onto frames.
2x 9.5cm x 14.5cm landscape (these 2 photos have a double mat - grey and orange) adhere on center of left page.
Add the two fussy cut machine corners.
2x 9cm x 14cm portrait - adhere on right page.
2x 6.5cm x 9.5cm landscape - adhere on right page.

Step 10
Color your chipboard title with  all-purpose inks.
Adhere chipboard title on right of layout. 

Step 11
Paint gears with Rust Effect Paint Paste.

Step 12
Embellish with extra chipboard elements, quotes, chains and beads.


I used a Michelle van Wyk Sketch!


Thanks for popping by.
Happy Scrapping!
Carol
Tuesday, May 21, 2019

Stamperia Workshop with Tzanidakis Antonis

I recently travelled to Cape Town, South Africa to attend a Stamperia workshop presented by Antonis Tzanidakis.

Wow, what an experience....we learnt so much....using so little.

Here are the projects I created:

Proejct 1 - London Clock
I changed the project slightly by using big clock hands instead of the little ones provided!

Project 2 - Fly Away Bottle
Once again I changed the project slightly.  As I am a scrapbooker by heart I wanted ot add a photo, so I remove the butterfly provided and put in a photo with a little title!

Project 3 - Fear the Deer Board

Project 4 - Journal


Some photos from the weekend
 
Thanks for popping by!
Happy Scrapping
Carol

Friday, April 12, 2019

Birthday Exploding Box

One thing I hate receiving and giving is a gift voucher.  It always feels so impersonal.  
This year my sister only wanted different vouchers for her birthday, 
so I decided to do a gift voucher with a difference.

The top of the box...
Side view
 The box open...top view! 
In the middle of the box I put a plastic tub filled with gelatos, and a chocolate underneath!
I decoorated the top so that she can use the tub somewhere else! 
 A photo from the side 
Each of the side panels had a pocket to put a voucher or small gift.
Side 1 had a gift voucher!
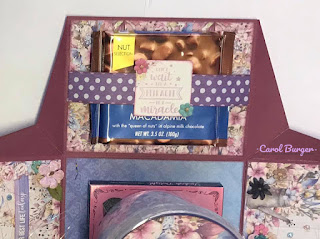
 Side 2 had some stamps and a small paintbrush to use with her gelatos.
 Side 3 had a chocolate!
 Side 4 had another gift voucher.
She absolutely loved her little box of surprises!

Pattern paper used is from Celebr8's New Beginnings Collection.
I add some Little Birdie Flowers and AC Cardstock.

Thanks for popping by.
Happy Scrapping
Carol


Related Posts Plugin for WordPress, Blogger...